The last time I programmed anything, programs started at the top of the Main function and proceeded to the bottom...if the Unix terminal was working. In my life, I have written one program in this new-fangled graphics/mouse paradigm. Uh, so it's time to change that. I'm currently trying to write a Solitaire/Klondike/Patience program to figure things out. First step: I need to shuffle a deck of cards.
Even if you are a methodical, obsessive human, you probably do not shuffle cards like a computer. When computers do things, they prefer to be told how to do them with repetitive but clear commands, with clear stopping and starting points (this is one definition of an algorithm). How to shuffle cards (when human): get the deck and divide it into two piles with about twenty-six cards, but you know, it doesn't matter a whole lot if they are uneven. Interlace the two piles. You will probably want to make that part look fancy and impressive. They say to shuffle seven times for approximate randomness, but no one does that. You can get away with two or three times, and then if someone is still giving you the stink-eye, you let them cut the deck. Of course, if you are really good at this, you have learned to exactly cut the deck into even piles and interlace the cards one-at-a-time from each pile. If you are that good, you are no longer allowed to play cards. Strangely, you have to be a certain level of bad at it to stay in the game.
If you are a computer, you will shuffle cards a different way:
A. Someone gives me a stack of cards called "Unshuffled Cards."
B. I randomly select any one Unshuffled Card and move it to another stack, which I call. "Shuffled Cards."
C. I continue to do this until there are no cards in Unshuffled Cards.
D. I announce that I have a deck of shuffled cards: Shuffled Cards.
This has the benefit that you get an entirely shuffled deck after only one go-round. Also, notice that any card has an equal change to be in any place, so any shuffle order of the deck is equally possible. (Vocabulary word: a "permutation" of a deck of cards is an arrangement of the cards in a particular order.)
As a human on the other hand, no one is going to sit there while you move cards one at a time to shuffle the deck. Also, no one is going to trust you to pick a random not-cheating card to place on the shuffled stack. It is better for humans to take the slightly-less-random but faster and more impressive shuffling method.
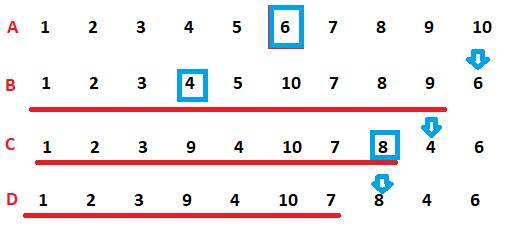
The standard algorithm for shuffling is called the Fisher-Yates algorithm. It uses the steps above, except it does not make a new stack for the shuffled cards. To save memory, it just uses the end of the current stack to store the new stack of shuffled cards, like this:
If I have a stack of ten "cards," as in A, the computer will pick the first card (here it picked the six), and move it to the end. Notice in B, the 6 is now at the end, and the 10 has been moved into 6's old location. The computer will pick the next "card," from the underlined numbers. They are slightly out of order now that the ten has been shoved in, but the computer does not care, and it does not affect each card's chance of being picked. In B, the computer has picked the four to be the next card. In C, the 4 has been moved to the end, and the computer is selecting the next card from the underlined ones. Here it has picked the 8. The 8 stays where it is, but it is no longer a candidate to be picked. In D, it is not underlined. So, the area of the list of numbers to be picked gets shorter and shorter while the area of shuffled numbers gets longer. Eventually, the entire list of numbers is shuffled from back to front.
Let's talk C#.
I'm going to show you my C# implementation of the Fisher-Yates algorithm. At the top of my file, I have the above stuff. "UnityEngine" is what is called a namespace. The "using UnityEngine;" line is important because it tells the compiler where to look for the Unity-specific commands I'm using. It also tells the compiler that in the case of two functions having the same name, I prefer UnityEngine's version. This latter thing actually causes a small issue here. The UnityEngine namespace defines a command called Random. Random can do a lot of things (click the link for a complete list), but it does not do what I want, which is to give me a random integer in a particular range (note that with extra math, it can be forced to work, but it is easier to avoid that). So, here, on the line "private.System.Random.rnd = new System.Random();" I am telling the compiler to look in the System namespace to use that Random function instead of UnityEngine's. I have to specify with "System[dot]" because I have told the computer that by default I am "using" UnityEngine's commands.
System's Random is a pseudo-random number generator. It's main use it to take a number and give you another number in return. The numbers are more-or-less uniformly distributed, but it always gives identical lists of numbers. For example, a list might be "7, 5, 2, 2, 6, 8, 25." If you start with a seven, you will always get the 5, the 2, another 2, etc, so the starting number is critical in getting the appearance of randomness. You do not want to always start with a seven. (Vocabulary: the starting number is called a "seed.") The "new" command, when it is activated, looks at the user's current date and time and uses that to seed the generator, so two users are unlikely-ish to encounter the exact same list of "random" numbers. In the code below, the command "Next" is used, which gets the next number on the "random" list.
And there it is. I'm storing the cards currently as an array of numbers 0-51. That may change later as I figure out what to actually do with the numbers to turn them into visible cards...um...I'm working on it! (It would not be hard to do, probably, except that no one has written a tutorial for "how to work in Unity if you are a relic from the age of dinosaurs.")
Showing posts with label unity. Show all posts
Wednesday, August 15, 2018
Thursday, August 2, 2018
Day Three: Unity Game Kits
Well, I finally understand the concept of "asset flipping." With Unity's 2D Game Kit, you too can make an absolutely terrible platformer in thirty minutes with no knowledge of coding. You could probably make a quite bad one in two hours. Compared to fast-food work, this is more profitable. I did not realize it was this easy.
I did not learn anything from the 2D Game Kit. The tutorial it includes only explains the interface. It tells you, for example, how to paint platforms onto the void by clicking on the tileset tool to access pictures of platforms. Note that this is not actually a "2D Game Kit." It is ONLY for making terrible platformers.
Anyway, there is NO information on how to open the 2D Game Kit, so see below if you want to do it for some reason. There is allegedly a sample game included, but I still haven't found it. I wish I could because the screenshots show dialogue and menus, and I haven't been able to find any information about how to do anything except a free-form level yet.
What I did find that was extremely helpful is this video by Youtuber Brackeys:
LINK
With this, I was able to start making some controls to move my cube. The first thing I did was to make a "Physic Material," which, strangely, is not misspelled. This is applied to the floor so that you can turn the friction off. The cube can then move smoothly over the floor.
Here is where the video leads:
The important part of this is the "FixedUpdate" function at the bottom, which happens a fixed number of times every second. First, a force is being added to the cube every time the function is called. The effect of this is to make the cube go forward faster and faster. The "If" statements conditionally add a sideways force to the cube, if the player is pressing the "a" or "d" cubes. (These are the traditional left and right keys for PC players, not the arrow keys for some reason.)
This is the code you will get from following the video, but Brackeys leaves you with homework. There are two problems with this code. The first one is huge, that it hard-codes many values, including the movement keys. If this code were in your game, there would be no way for the player to choose an alternate control scheme. If you wanted to add that functionality, you would have to spend hours checking every line of code and replacing all the "d" and "a" references. Here is how I fixed this, which I cannot guarantee is correct:
I just added some variables to contain the desired values. I added variables for the key bindings and for the values of the forces involved. (The values are numbers, but they have an "f" at the end to specify they are floating point decimals, even though the values listed are integers. Apparently, if the "f" is not there, this can cause errors sometimes. Weird.) Ideally, I would not specify that kbMoveRight IS definitely "KeyCode.D" here in the script but fetch that information from a player preferences file. I don't have one of those yet, though.
The more subtle problem with the code, according to Brackeys, is that FixedUpdate is not constantly being called, so if the player is taping keys quickly, you might miss some of their key taps. Here is what I did to try to fix that:
The function "Update" is called very fast, so I put some boolean flags in there which are set if the player is tapping a key. Later, when fixedUpdate is called, it responds to those taps. I think this is what Brackeys suggested, but he was talking very fast in that part of the video, so, again, I don't guarantee that this is completely correct code.
To sum up, I now have a featureless white floor on which there is a red cube which quickly speeds into the distance. If you are quick, you can move it left or right before it falls into the void. Nice.
...
How to open (in Windows) the 2D Game Kit from the Unity Store*
*Guaranteed to work until it doesn't.
1. Open Unity, and start a new 2D project by clicking "new" and typing in a name. Be sure to select 2D from the Template drop-down.
2. Close the project and Unity.
3. With a browser, go to the Unity Asset Store, go to the 2D Game Kit page, and "Add to My Assets" the 2D Game Kit.
4. The button will change to "Open in Unity." Click on that. Windows will ask, so tell it to "Open With" Unity.
5. The main Unity menu will open, but the asset will not open. Open your previously saved project. The project will now have a Window in the center of the screen that has the logo for the 2D Game Kit. Click the "Update" or "Import" button on this window. The button will change to a slowly-incrementing counter. When this completes, Unity will ask if you want to Import a Complete Project. Click yes and wait some more. A box with a progress bar will pop up.
6. Eventually, a menu with a file hierarchy will pop up. Make sure every file is checked, and click "Import." Watch the progress bar some more. For me, this took > 15 minutes.
7. Once that finishes, the menu bar will not yet contain the extras needed by the tutorial. Close Unity.
8. Reopen Unity. Reopen the project. There will still be nothing there, but now you can go to the Unity Learn page and follow the tutorial.
I did not learn anything from the 2D Game Kit. The tutorial it includes only explains the interface. It tells you, for example, how to paint platforms onto the void by clicking on the tileset tool to access pictures of platforms. Note that this is not actually a "2D Game Kit." It is ONLY for making terrible platformers.
Anyway, there is NO information on how to open the 2D Game Kit, so see below if you want to do it for some reason. There is allegedly a sample game included, but I still haven't found it. I wish I could because the screenshots show dialogue and menus, and I haven't been able to find any information about how to do anything except a free-form level yet.
What I did find that was extremely helpful is this video by Youtuber Brackeys:
LINK
With this, I was able to start making some controls to move my cube. The first thing I did was to make a "Physic Material," which, strangely, is not misspelled. This is applied to the floor so that you can turn the friction off. The cube can then move smoothly over the floor.
Here is where the video leads:
The important part of this is the "FixedUpdate" function at the bottom, which happens a fixed number of times every second. First, a force is being added to the cube every time the function is called. The effect of this is to make the cube go forward faster and faster. The "If" statements conditionally add a sideways force to the cube, if the player is pressing the "a" or "d" cubes. (These are the traditional left and right keys for PC players, not the arrow keys for some reason.)
This is the code you will get from following the video, but Brackeys leaves you with homework. There are two problems with this code. The first one is huge, that it hard-codes many values, including the movement keys. If this code were in your game, there would be no way for the player to choose an alternate control scheme. If you wanted to add that functionality, you would have to spend hours checking every line of code and replacing all the "d" and "a" references. Here is how I fixed this, which I cannot guarantee is correct:
I just added some variables to contain the desired values. I added variables for the key bindings and for the values of the forces involved. (The values are numbers, but they have an "f" at the end to specify they are floating point decimals, even though the values listed are integers. Apparently, if the "f" is not there, this can cause errors sometimes. Weird.) Ideally, I would not specify that kbMoveRight IS definitely "KeyCode.D" here in the script but fetch that information from a player preferences file. I don't have one of those yet, though.
The more subtle problem with the code, according to Brackeys, is that FixedUpdate is not constantly being called, so if the player is taping keys quickly, you might miss some of their key taps. Here is what I did to try to fix that:
The function "Update" is called very fast, so I put some boolean flags in there which are set if the player is tapping a key. Later, when fixedUpdate is called, it responds to those taps. I think this is what Brackeys suggested, but he was talking very fast in that part of the video, so, again, I don't guarantee that this is completely correct code.
To sum up, I now have a featureless white floor on which there is a red cube which quickly speeds into the distance. If you are quick, you can move it left or right before it falls into the void. Nice.
...
How to open (in Windows) the 2D Game Kit from the Unity Store*
*Guaranteed to work until it doesn't.
1. Open Unity, and start a new 2D project by clicking "new" and typing in a name. Be sure to select 2D from the Template drop-down.
2. Close the project and Unity.
3. With a browser, go to the Unity Asset Store, go to the 2D Game Kit page, and "Add to My Assets" the 2D Game Kit.
4. The button will change to "Open in Unity." Click on that. Windows will ask, so tell it to "Open With" Unity.
5. The main Unity menu will open, but the asset will not open. Open your previously saved project. The project will now have a Window in the center of the screen that has the logo for the 2D Game Kit. Click the "Update" or "Import" button on this window. The button will change to a slowly-incrementing counter. When this completes, Unity will ask if you want to Import a Complete Project. Click yes and wait some more. A box with a progress bar will pop up.
6. Eventually, a menu with a file hierarchy will pop up. Make sure every file is checked, and click "Import." Watch the progress bar some more. For me, this took > 15 minutes.
7. Once that finishes, the menu bar will not yet contain the extras needed by the tutorial. Close Unity.
8. Reopen Unity. Reopen the project. There will still be nothing there, but now you can go to the Unity Learn page and follow the tutorial.
Monday, July 30, 2018
Day 2: Fun With Tutorials
Unity is infamous for its poor documentation. They have a lot of tutorials, walkthroughs, and documentation available, but these are mostly out of date and/or ambiguous.
Here is a scene from the first Unity tutorial on C#:
This shows coding in Unity's old coding environment called MonoDevelop, which as far as I can tell no longer exists. Instead, Unity opens Visual Studio when you click on code. The first problem is that this code doesn't work in Unity today. It doesn't even warn for deprecated code and continue; it just refuses to work at all. Here is what did end up working. Note that if you are reading this a few months from now, Unity will probably have changed again, and this will no longer work either.
Fortunately, Visual Studio automatically added the line "using UnityEngine," which is apparently necessary now. As far as the middle part, I found the updated code by reading all the Youtube comments on this video. There were nearly one hundred of them complaining that the code does not work and one brave soul who told how to change it. Thank you, Mr. Baumgartner!
He has the "this" keyword in his code. When I tried that, Visual Studio informed me that using "this" is outdated. Okay, whatever.
What this code is supposed to do is, when you press the key "R," this changes the thing on the screen to red from...whatever it was before. This script works for any object in the game it is applied to. Notice the code uses the generic keyword "gameObject." You write code in this generic way, then drag and drop it onto the game object you want it to work with. For this example, I made my cube turn red.
The floor and the infinite void are not red, even though I hit the "R" key because I did not drop the enreddening script onto those objects.
Well, that was nice.
Another thing wrong with the tutorials is their selection of material. The first video is at great pains to explain you can use the keywords "red," "green," and "blue," but it does not explain what the semicolons and colons mean, why the dots, what a renderer is. What is with those angle brackets and parentheses? I think if you were not already familiar with coding that this would be absolute nonsense to you. As for me, I am still not clear what a "behavior component" is and why it is important that a script is one.
The videos cover loops, conditionals, scope, and vector math, all in 2-5 minutes apiece. They even have a video on Quaternions! I was amused how violent the vector video was. Figuring out the length of a hypotenuse was framed as decided whether two people with guns with a particular firing range can kill each other. Deciding on the torque to aim a cannon was the example for cross products.
As a curriculum, these are really poorly planned, is what I'm saying. It is just enough to get a complete beginner absolutely frustrated. I'm not sure why these exist. Perhaps Unity wanted to give the appearance of helpfulness without actually devoting any funding to the project? Anyway, sample 2D and 3D game levels with tutorials attached apparently exist, so I'm going to try those next. Here is a link to the Unity C# Scripting Tutorials if you want to try them out:
LINK
Here is a scene from the first Unity tutorial on C#:
This shows coding in Unity's old coding environment called MonoDevelop, which as far as I can tell no longer exists. Instead, Unity opens Visual Studio when you click on code. The first problem is that this code doesn't work in Unity today. It doesn't even warn for deprecated code and continue; it just refuses to work at all. Here is what did end up working. Note that if you are reading this a few months from now, Unity will probably have changed again, and this will no longer work either.
Fortunately, Visual Studio automatically added the line "using UnityEngine," which is apparently necessary now. As far as the middle part, I found the updated code by reading all the Youtube comments on this video. There were nearly one hundred of them complaining that the code does not work and one brave soul who told how to change it. Thank you, Mr. Baumgartner!
He has the "this" keyword in his code. When I tried that, Visual Studio informed me that using "this" is outdated. Okay, whatever.
What this code is supposed to do is, when you press the key "R," this changes the thing on the screen to red from...whatever it was before. This script works for any object in the game it is applied to. Notice the code uses the generic keyword "gameObject." You write code in this generic way, then drag and drop it onto the game object you want it to work with. For this example, I made my cube turn red.
The floor and the infinite void are not red, even though I hit the "R" key because I did not drop the enreddening script onto those objects.
Well, that was nice.
Another thing wrong with the tutorials is their selection of material. The first video is at great pains to explain you can use the keywords "red," "green," and "blue," but it does not explain what the semicolons and colons mean, why the dots, what a renderer is. What is with those angle brackets and parentheses? I think if you were not already familiar with coding that this would be absolute nonsense to you. As for me, I am still not clear what a "behavior component" is and why it is important that a script is one.
The videos cover loops, conditionals, scope, and vector math, all in 2-5 minutes apiece. They even have a video on Quaternions! I was amused how violent the vector video was. Figuring out the length of a hypotenuse was framed as decided whether two people with guns with a particular firing range can kill each other. Deciding on the torque to aim a cannon was the example for cross products.
As a curriculum, these are really poorly planned, is what I'm saying. It is just enough to get a complete beginner absolutely frustrated. I'm not sure why these exist. Perhaps Unity wanted to give the appearance of helpfulness without actually devoting any funding to the project? Anyway, sample 2D and 3D game levels with tutorials attached apparently exist, so I'm going to try those next. Here is a link to the Unity C# Scripting Tutorials if you want to try them out:
LINK
Saturday, July 28, 2018
Day 1: Fooling Around With Unity
The time has come--the time to make a video game. Am I skilled? Ah, well. Driven? Er... Talented? Um. Ingenious? You see...
Okay, do I have a computer, and have I downloaded Unity? YES. The answer is YES.
Unity is a game development engine that provides a lot of tools, such as automated gravity and lighting. It even has rudimentary AI behavior. Most importantly, it is entirely free until your or your company starts making more than 100,000 USD per year by selling games made with the engine. If this happens, you have to license the software, but you still don't have to pay royalties. Well, that is a problem for future me. Unity connects with Visual Studio where you can write your code in, typically, C#, but you can also use JavaScript (technically an offshoot called UnityScript), or possibly some other languages.
I, of course, know none of those languages.
Alright, first things first. This is going to be a 3D game, so...
Huzzah! I'm not the very first clueless person to fire up Unity. Oh! I forgot the most important step:
This means that the "finished game" will not attempt to send information from the user back to me, the developer. The silly file I'm about to make will never have users, but it's important to take a stand sometimes. Um, I actually have no memory of learning what Unity Analytics are and how to turn them off, so I'm going to assume that the knowledge was floated to me from my alter-universe counterpart who is already a successful game dev. Good job, me!
Unity starts you out with a skybox (the blue thing), a sort of grey void that goes down to NaNfinity, and some, um, lighting. Also, there is a camera present, and you can see its viewpoint in the lower half of the screen. That window, the "game window" is supposed to be what a player would see.
The "creating floors for level" thread up there was super helpful. I have added an eye-blisteringly white floor. That is the floor-shaped thing in the picture*. I have also figured out how to add a cube to the scene and turn on gravity. For reasons that I'm sure will be explained later, Unity uses the Y-axis for "up," so I had to move this 1x1x1 cube 0.5 units Y to make it rest on the floor.
Okay, well... *whew* It may be time to take a nap. I'm not used to accomplishing this many impressive things in one day.
*Just in case you found this post by asking Google how to make a floor, add a Plane to your scene. It is in the Game Object > 3D Object folder. It seems that by default, objects do not fall through a Plane, so that's nice.
Okay, do I have a computer, and have I downloaded Unity? YES. The answer is YES.
Unity is a game development engine that provides a lot of tools, such as automated gravity and lighting. It even has rudimentary AI behavior. Most importantly, it is entirely free until your or your company starts making more than 100,000 USD per year by selling games made with the engine. If this happens, you have to license the software, but you still don't have to pay royalties. Well, that is a problem for future me. Unity connects with Visual Studio where you can write your code in, typically, C#, but you can also use JavaScript (technically an offshoot called UnityScript), or possibly some other languages.
I, of course, know none of those languages.
Alright, first things first. This is going to be a 3D game, so...
Huzzah! I'm not the very first clueless person to fire up Unity. Oh! I forgot the most important step:
This means that the "finished game" will not attempt to send information from the user back to me, the developer. The silly file I'm about to make will never have users, but it's important to take a stand sometimes. Um, I actually have no memory of learning what Unity Analytics are and how to turn them off, so I'm going to assume that the knowledge was floated to me from my alter-universe counterpart who is already a successful game dev. Good job, me!
Unity starts you out with a skybox (the blue thing), a sort of grey void that goes down to NaNfinity, and some, um, lighting. Also, there is a camera present, and you can see its viewpoint in the lower half of the screen. That window, the "game window" is supposed to be what a player would see.
The "creating floors for level" thread up there was super helpful. I have added an eye-blisteringly white floor. That is the floor-shaped thing in the picture*. I have also figured out how to add a cube to the scene and turn on gravity. For reasons that I'm sure will be explained later, Unity uses the Y-axis for "up," so I had to move this 1x1x1 cube 0.5 units Y to make it rest on the floor.
Okay, well... *whew* It may be time to take a nap. I'm not used to accomplishing this many impressive things in one day.
*Just in case you found this post by asking Google how to make a floor, add a Plane to your scene. It is in the Game Object > 3D Object folder. It seems that by default, objects do not fall through a Plane, so that's nice.
Subscribe to:
Posts (Atom)
Shuffling Cards When You Are a Computer
The last time I programmed anything, programs started at the top of the Main function and proceeded to the bottom...if the Unix terminal was...
-
Well, I finally understand the concept of " asset flipping ." With Unity's 2D Game Kit, you too can make an absolutely terri...
-
The last time I programmed anything, programs started at the top of the Main function and proceeded to the bottom...if the Unix terminal was...
-
The time has come--the time to make a video game. Am I skilled? Ah, well. Driven? Er... Talented? Um. Ingenious? You see... Okay, ...